My customers often say my photographs of my cards don't do them justice, compared to when they see them in person. With this Thank You card I have to agree. You'll want to make your own just so you can see how amazing this card looks up close when you hold it in your hands. The floral oval sitting atop the floral background works nicely together up close.
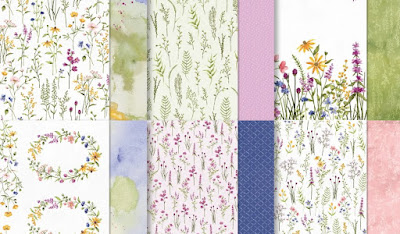
This Dainty Flowers Designer Series Paper is only available through February 28, 2023 as one of the reward choices from Stampin' Up!s Sale-a-Bration promotion. This opportunity only happens once a year. Place a $50 order with me before tax and shipping and you can select this fabulous pack of DSP. Oh the fun you are going to have with it!
If you purchase the Something Fancy Bundle (link and photo for
Something Fancy Bundle stamp set and tag dies shown below) for $45.75 plus a package of Dimensionals for $4.25 you'll be at $50 USD perfectly. Then you can choose this special paper! That's a $12 value!
Images (c) Stampin' Up!
CUTS TO MAKE:
Rich Razzleberry Card base - 4-1/4" x 5-1/2"
Dainty Flowers Designer Series Paper - 5-1/2" x 12", scored very gently at 4", 6" and 8",
fold into a W shape.
Pink design from Dainty Flowers Designer Series Paper - 1" x 4"
From the Dainty Flowers Designers Series Paper - fussy cut one of the floral ovals out including the inner oval portion out.
Measure the inner oval area and cut out a slightly larger piece of Basic White.
Inside of Card
Cut a piece 1" x 5-1/4"" of Dainty Flower DSP and a 2-1/2" x 5-1/4"" piece of Basic White for the inside card back portion.
Inside Circle Centerpiece
Cut a 3" square of Rich Razzleberry cardstock
Cut a 2-1/2" square of Basic White cardstock
Exterior Envelope Flap
Dainty Flowers matching piece cut 2-3/8" x 6"
ASSEMBLY INSTRUCTIONS:
Stamp: With Rich Razzleberry Ink, stamp the sentiments shown on the inner oval Basic White and the 2-1/2" square
Die Cut the two circles out, the 2-1/2" larger one in Rich Razzleberry, and the 2-1/8" smaller one in Basic White.
Adhere the scored and folded DSP to the Rich Razzleberry flat card base.
Adhere the two circles together for the inner section and carefully adhere to only the left side of the circle so no adhesive will escape.
Adhere the 1" x 5-1/4" of Dainty Flower DSP and a 2-1/2" x 5-1/4" piece of Basic White to the inside card back portion evenly spaced all around.
Adhere the pink 1" x 4" DSP to the card front across in the middle horizontally.
Adhere the front stamped oval behind the fussy cut floral oval, then raise up on the card front with Dimensionals. Then add two Brushed Brass Butterflies as shown.
Adhere the DSP on the exterior envelope flap and trim off the excess paper.
Voila! A Beautiful Thank Your card set is finished! Hope you had fun!
If you don't already have your own Stampin' Up! Independent Demonstrator, I'd love to be yours!
Learn how to get more done in less time by signing up for my exclusive "Insider" bi-monthly newsletter. Twice a month the news will share card class information, Stampin' Up! promotions, hot tips from me, and free tutorials! Subscribe to my Bi-Monthly Newsletter today. Plus you’ll receive a FREE 14 Card One Sheet Wonder Tutorial to download when you receive my thank you email for signing up.
Please contact me or email me at stampinwitheva@gmail.com if you have any questions about products, techniques, or card designs. Comments below are welcomed too!


No comments:
Post a Comment
Thanks for taking the time to leave me a comment! I appreciate hearing from my readers. If you have a question or anything I can help with please let me know. Have a wonderful day!